Tuesday, May 31, 2016

Day 9 (or maybe 10)

There have not been a lot of great picture opportunities these last few days, so I've been waiting. But I just wanted to keep you in the loop so I took some pictures today just to show you the little visible work that has been done. Our contractor has been taping and mudding for the last few days which seems to take a long time. He is doing two big rooms, the ceilings in both, and our laundry room downstairs all by himself, so I would imagine that does take some time. Today he started sanding which created a bunch of dust but I think he will now be able to texture and drum roll.... paint! We've been told we'll have paint and flooring by the end of the week. I'm getting excited! We got to pick out all our finishes (counter top, back splash, flooring and lighting) yesterday and I was a bit giddy. So I think our part is officially done and decided, they just need to put it together. :)

Here are the photos with the walls taped and mudded.


Here is our new tank-less water heater. This is one of those things you'll have to ask Steve about, but apparently it's a nice feature. 


I probably won't post tomorrow, but I think we'll at least see some paint on the walls the next day, and that, I'll show off!

Wednesday, May 25, 2016

Day 5 - 7

As always, I'm a bit behind so I'm going to catch you up on the last 3 days of work starting with Day 5.

Day 5

Wow, did we come back from Great Wolf Lodge to a few surprises. Upon opening the garage, we were surprised to see both our outdoor shed equipment and our laundry room cabinets now sitting in our garage. Part of the this project was to upgrade our house to natural gas and this has disrupted more rooms in our house than we realized it would. We had been told to clean out the laundry room which we had done, but apparently the work in there was more extensive then originally thought. When we went to inspect, the ceiling was gone for the new gas pipe that was installed. Same with the shed where we have removed the hanging the bike they had originally asked us to remove, not enough. They removed all of Steve's shelves with all our gardening supplies on them, the lawn mower and all the kid's toys. Upon inspection there, we found the new pipe along the roof and sides of the shed, so it makes sense that they had to remove everything. Here are the gutted pictures of the two rooms:


Shelves removed from outside shed and new pipe coming in the wall and up to the ceiling.


Gas pipe along the ceiling and out where Steve's other shelves had been to the back of the house.


You can see where the laundry room cabinets had been by the beautiful yellowish paint left in their place. 


Ceiling removed in our laundry room to make room for the new pipe.


And here is that same beautiful pipe on the backside of our house before it heads into our laundry room.

But besides all the crazy plumbing, the walls were built back up between our living room and kitchen/dining room. Oh, I can see it now and I am happy!


And last but not least, on Day 5 they started the electrical in the kitchen. Here's a picture of the can lights and boxes for our pendants. I like this part, the putting stuff back together part. :) 


Day 6

Day 6 was a lot more behind the scene electrical so I didn't take any pictures of that part because there is not much to see. However, they also took the popcorn ceiling down in our living room which I couldn't be more happy about. Fun thing with that though, because we can't have a simple project in our house. There was a patch near our outside living room wall that I had discovered a couple of years ago that was weak and looked to be due to an old water leak. So weak in fact when I lightly pushing the ceiling to test if it was currently wet, my finger easily went through the Sheetrock. Oops. So we'd been living with a hole in the ceiling for the last couple of years and I was looking forward to getting it fixed. Turns out, when they got to that section of the ceiling to remove the popcorn, they also very easily punched a bigger whole in the Sheetrock. 


But here's the thing that this picture doesn't show well; this weak spot is not due to past water damage. This hole is due to... a bee/wasp hive that has been up there and the little guys had eating away at the Sheetrock and insulation for who knows how long. Gross! There were not bee/wasps in there when they opened the hole, thank goodness, so we are planning on just cleaning it out and patching it up. Fingers crossed this is an old, not reoccurring problem. 

Day 7

Day 7 was an exciting day for me because the Sheetrock has started to go up everywhere and the electrical is done! This is the beginning of the fun part for me. We should be on to painting and flooring next week and then it's just a hop skip and a jump to the end right? Just tell me it is okay?!? You'll have to check out the old posts to compare the before and after of the walls to fully appreciate how exciting the Sheetrock is. Oh, and our ceiling isn't exposed anymore which should help keep the house warmer in the night. It's been a bit drafty the last couple of weeks. 


And that's it, you're all caught up. 


Saturday, May 21, 2016

Day 4

This was a small day because there was just one worker and the electrician and plumber were not able to come out as planned. But the new support beam was put up between the kitchen and the living room and that WAS a big job.


Here it is. The new shiny support beam.


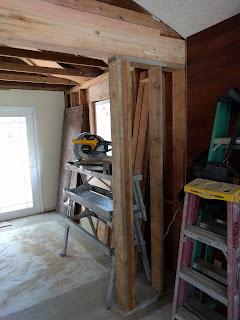
New framed wall that you will see as you walk up the stairs.


New framed wall between the dining room and living room.

We left the next day for a mini vacation with the girlies so we didn't get to see what they did the next day until we got back. But here's our vacation destination with some cute girlies to show it off!


Tuesday, May 17, 2016

We're back on! - Day 3

So I realize I started this and then left you hanging for a week. We hit a hiccup in our kitchen remodel that had to put the whole project on hold while we found a solution. I am going to give you the elementary version of the problem so if you want more details, talk to Steve. ;)

Steve and I had a feeling that the kitchen wall we wanted removed was a supporting wall and that the new opening would have to be reinforced to continue to support the roof above our heads. Good plan right?!? What we didn't know, and our contractor discovered once he got into the floor below the kitchen wall, is the second floor where are kitchen is, was not supported by the beam below. Um, not good. (This we did not know to worry about.) Apparently the beam used when the house was built is not strong enough for long term support and although will probably not catastrophically fail, is still not the best thing. So after some back and forth with my engineering husband and the architect our contractor called in to calculate the safest way to support our house, we came up with a solution that isn't completely aesthetically pleasing, but really, when it comes to keeping the second floor where it belongs, a pretty good choice. And now we can continue with the remodel.

So today, they put the new support in needed under the floor of the kitchen to support the roof (yes, we are both reinforcing the beam on our bottom floor and the roof ) and soon we'll get the part needed to reinforce that lower floor beam. Here's the nifty beam they put in the floor which is now covered up with sub-floor. Luckily Steve got pictures before they closed it up for the day.


They had to move some pipes around under our floor to make way for the beam as well, but I can't tell what from these photos. 

So that's it for today. It doesn't seem like they did much compared to all the work that we were able to see the last two days, but they worked hard all day to do this part right. I'm thankful these guys are doing it right and not cutting any corners just to keep the project on time. 

Hopefully from now, for us visual people, it will be more fun to see all the new things (floor, walls, cabinets) that will start going in. 

Tuesday, May 10, 2016

Kitchen 2.0

It's been awhile since I've posted anything here, and after the kitchen remodel, it will probably be a while before you hear from me again. I just don't have the time with two small kiddos and one on the way. ;) But for those of you who are interested, I thought I'd try to throw some pictures up for you and take you along our kitchen remodel adventure.

First off, I took before pictures but they are currently stuck on our SLR camera because I can't find the piece I need to transfer the pictures from the camera to the computer due to the chaos our house is currently in. So I'm going to use the pics from when we were looking to buy this house... 5? years ago? Has it been that long already?!?

Here goes Before:

Living room with carpet


From living room looking at the wall between the living room and kitchen. Wood siding and carpet island grrrrr.


From the dining room into the kitchen. Blasted carpet island!!


From the kitchen into the dining room with the peninsula. Notice I was pregnant with Bri back then. I've pretty much been pregnant since living in Washington. I think I'm going to stop drinking the water!

And now, day 1:


Wall's almost down. Carpet, wood floor and that blasted island is gone! Wood siding gone. Gone gone gone. Oh, and look at that cute demo crew. They are not for hire. :)

Day 2:


Wall's almost completely gone with the new support beam resting on the ground.


New window! Now I can watch my girlies play in the side yard while reading a book in our soon to be book nook area. That's the dream at least. Might be a few years before I get there. ;)


View of window from the side yard.

And now you're up to date but I can't leave without showing off my little cuties. Here's a recent picture of Brielle and Adilyn: